
Setting up Centers in a Resource Classroom
Alright teacher-friends, get ready to learn all the ins and outs of running centers in a resource classroom! It took me four years of teaching to get this system honed, and I'm really excited to share it with you.
This post contains affiliate links.
For context, I use this system with my K-4 reading resource ("pull out") students, though mostly 3rd/4th last year. I see these ten students for one hour a day, all of them together, no paraprofessional. I spend the first 25-30 minutes together whole group on the rug, for a morning meeting of sorts and our Common Core-aligned comprehension lesson. Then, we move into our groups to work on foundational skills for the rest of our time together.
Making Groups
Because I use this time to work on foundational skills, I create my groups based on students' phonics and sight word level. I use my diagnostic test from my Phonics by Design curriculum to determine their phonics levels, and do a basic sight word screener to determine how many words they know. I take running records as well to get an idea of whether I'll be able to keep the same groups for guided reading. Last year, my Group 1 started out working on pre-primer and primer sight words, mastering all letter sounds, and CVC words. My Group 2 needed a brief review of beginning phonics skills and then more in-depth intermediate phonics instruction (r-controlled vowels, vowel diphthongs, etc.), as well as second and third grade sight words. Group 3 needed a brief review of 1-syllable phonics skills, and then was ready to move on to multi-syllable words. These groups will determine what the students work on during small group time with you, as well as what tasks you will provide for centers.
Making A Schedule
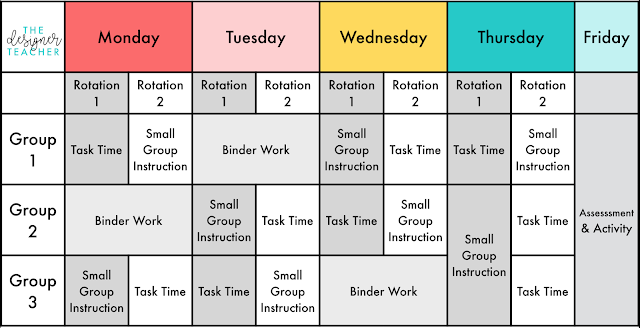
Your schedule will depend on the number of groups you form, as well as much time you have. I have two rotations a day. One group will work with me, while the other will work on a task (more on that to come), and then switch. The third group works on independent work in their binder for both rotations. I show my Groups 2 & 3 combined on Thursday on my schedule, which I would often do, but I also might just see whoever I needed to see at that time. Between days off, assemblies, IEP meetings, and absent students, I would rarely see all of my students for a full hour all five days of the week. I could skip the "Thursday" schedule and still see each group a minimum of two times and each group would have task time twice. The binder work consists of fully independent work that the students can do with no help from me whatsoever. I felt like they were getting that opportunity so rarely (because they were inclusion the rest of the day), that I wanted to make sure they got to chance to complete something start to finish independently. This also allowed me to work with my small groups without (for the most part) interruption. I used the independent work from my Phonics by Design curriculum each week (which you can also buy separately as NO PREP Word Work if you don't need a whole curriculum), or else reading passages and questions for my highest group. On my sample schedule below, each rotation is 15 minutes long.
Choice Boards
I was so inspired by all the work tasks I would see in self-contained rooms, but at first (by at first, I mean three years) I wasn't quite sure how to make the system work for my resource students. Last year, I came up with a Task Time Choice Board (gets yours for free below!), which I was able to use ALL YEAR. It was the gift that kept on giving. The choice board has nine choices on it, and each student would get a copy in their binder each week. Their job was to complete three of the tasks in a row each week. They would color in the task they completed after they finished. This was the golden ticket I needed to ensure choice AND accountability. Initially I gave all three groups the same choice board (but the tasks themselves were different), but as my school began a push towards sustained independent reading, I changed many of the choices for my higher groups to reading. I also have a couple different versions of the choice boards that I would switch out from time to time, so that students didn't get into the habit of doing the same three choices each week.
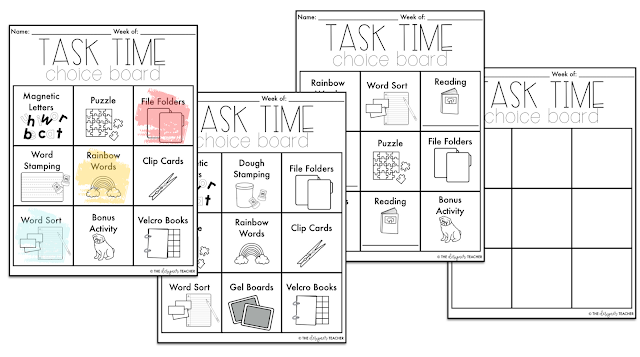
You can get the choice boards by entering your email below! It includes 10 variations + a blank version in case you want to use different tasks.
Tasks
Okay, onto the tasks! Some of my choices for tasks are clip cards, puzzles, word sort, file folders, adapted books, magnetic letters, play dough stamping, gel boards, rainbow words, independent reading, and a "bonus" activity. When I switched up the choice boards I would rotate some of these in and out of the grid to keep the students interested. I store the choices that are different for each group in plastic bins with the group number on it, and the choices that are the same for all groups on a shelf nearby. The differentiated tasks (clip cards, puzzle, word sort, file folders, adapted books, and bonus) would stay the same all month. Yep, all month! Because students are only (typically) doing 3 tasks a week, they only end up repeating most activities once or twice, which gives them a chance to improve. If they're getting bored with it, they just don't choose that one!
A little more on each choice:
Clip Cards
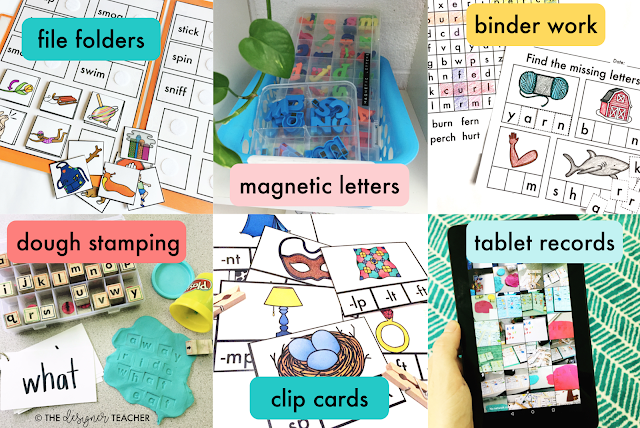
Each group had it's own clip card bin. Clip cards are one of my favorite tasks because you just print, laminate, cut, and throw in some clothespins. I mostly use my Centers by Design Clip Cards, which align to what the students are working on during their small group instruction with me. After a student completes the clip cards, s/he spreads them out and takes a picture with the tablet (I use this inexpensive Amazon Fire) to record their answers. Then s/he undoes the clips and puts back the bin. I know it's probably not best practice to have them undo the clips, but my students really didn't seem to mind-- they actually like undoing them, and they know their work is recorded on the tablet. When I didn't have them undo them themselves, I often wouldn't get to re-setting them (re: no para) and then they wouldn't be ready for the next kid.
Puzzles
This is another one that's differentiated for each group. I used phonics and sight word puzzles from Lakeshore Learning, the Target Dollar Spot, as well as some I made myself. Like the clip cards, the student assembles the puzzles and then records his/her work with the tablet before taking the puzzles apart.
Word Sort
Each group has a word sort that aligns to their small group instruction. I use my Centers by Design Word Sorts, as well as my Alphabetical Order Activities for my higher groups. I copy the recording sheets at 70% so they fit nicely in the work task tubs, and then you just include the word cards. Frankly, I've even stopped laminating the word cards because they just don't get that beat-up. Students don't need to take a picture of their work because they can just turn in the recording sheet in the turn-in basket.
File Folders
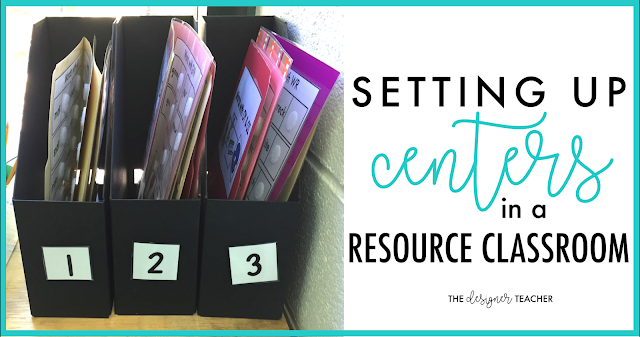
I organize the file folders for the three groups in three different magazine holders that I place on top of the shelf with the task tubs. Each holder contains three file folders-- for my purposes, three file folders = one task. When completed, students spread out all three file folders, record their work with the tablet, and reset the folders. I use my Centers by Design File Folders to give them practice on their current phonics skill, and I sometimes mix in some older skills to give them some review!
Adapted Books
Sometimes I would differentiate the books into different tubs, sometimes not. ALL my students need preposition practice, so I would often use my Seasonal Adapted Preposition Books. But I would also mix in my Centers by Design Phonics Adapted Books as needed. My students love adapted books, so I didn't feel the need to have them record their work. You could have them take a video on the tablet reading the book, however, or sometimes I would have my kids read to someone else in their group.
Bonus
I put the bonus activity on the schedule so I could include any fun or needed activities I found! You know, those Dollar Spot finds or the adorable center you see on TPT. You could easily exclude this if you don't think you'll use it!
Magnetic Letters
Students build their sight words using magnetic letters on a magnetic board. My students all have 10 words on their sight word rings (more details about that here) at a time, so they would make those ten words. They would record their work with the tablet and then put the letters away. My higher students were no longer working on sight words by the end of the year, so I took this choice off their boards.
Play Dough Stamping
Like the magnetic letters, this is only for students working on sight words. They take their sight word rings and stamp the words into flattened play dough using letter stamps. They then record their work with the tablet before cleaning up. Some friends had a lot of trouble not playing with the play dough, so I tended to rotate this choice on and off their boards. You could also have them stamp on paper-- I just like to cut down on papers floating around as much as possible!
Gel Boards
These are another option for students working on sight words. Students take their rings and write out their sight words on a gel board, take a picture, and clean up.
Rainbow Words
Another sight word choice! The bin has rainbow templates and a container of markers. Students write each of their sight words (repeating the word as many times as will fit) in each stripe of the rainbow in a different color. They don't need to take a picture, as they'll turn in their rainbow in the turn-in basket.
Independent Reading
For my students no longer working on sight words, they have Independent Reading listed for several choices. Students grab their book box, choose a spot, and read the whole time. When it's time to switch, they write the title of the book they read on the line on their choice board. All students also read independently if they finish their task early.

I know this might seem like A LOT of tasks to keep up with, but only 5-6 of them need to be different for each group, and you're only changing them out once a month. So that's 15 tasks once a month, and once you have the tasks prepped, they can be used over and over again. My Group 2 students were ready for Group 3's tasks by the end of the year, so I was able to reuse those even within the same year. And at times I would also combine tasks for Group 1 & Group 2 or Group 2 & Group 3.
Grading
Obviously these "tasks" are very different from what would be used in a self-contained or autism classroom. I don't take data on the tasks, but rather use them as a way for students to get needed practice in a tactile, engaging way, rather than just completing worksheets. On Friday, my students complete and turn in their choice boards for the week, which is what I grade. I grade the boards out of 5-- 1 point for each completed choice (3 points total), 1 point for completing three in a row, 1/2 a point for name, and 1/2 a point for date. In that sense, it's essentially a completion grade. If I have any doubt that the kids are completing the tasks, I can check the tablet, but I purposely set the room up so I can see all kids at all times from my small group table.
Complicated as this may sound, once I got this system set up at the beginning of the year, it was the LEAST amount of work to maintain out of any other centers system I've used. You can use the same schedule and routines all year, which makes lesson planning so much easier! And after a couple weeks, the kids have it DOWN. Whenever I got a new student, I would just have them "shadow" another student in their group. That student would always take so much pride in showing the new one how everything works! Because the students have choice in the tasks they complete, I found student engagement to be very high. And if this STILL seems like a lot-- simplify it! And guess what? If you don't change out all the tasks on the 1st of the month, nothing horrible will happen. I had to remind myself of that when I just had too many things on my to-do list.
I really hope getting a glimpse (okay, more of a long look) into my rotations will help you plan your own centers this year! If you want to get a jumpstart on tasks you can use all year, you can snag my Centers by Design Bundle to save almost 50% over buying each center individually.
P.S. Don’t forget to snag your choice boards!